3D Central
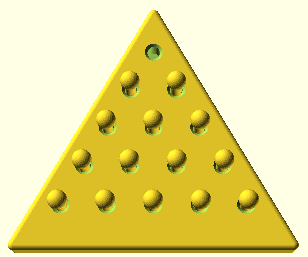
UPDATE: I'm totally embarrassed. I initially published the wrong design. I was in too much rush. I used a faulty view of the game, missing a whole row of holes. This design is corrected now...I think.
Triangle Peg Puzzle/Game
Jump for joy, here's a stocking stuffer in time for Christmas.
(This game is not original, here, of course.)
Gameplay: Put pegs into all but the top hole of the triangle. Jump over and remove pegs from the board until no more moves can be made. The fewer pegs left, the better your score.
1 peg left = genius
2 pegs = smart
3 pegs = average
Putting the starting hole in a different place can add to the game's difficulty.
The design itself begins relatively straightforward. It starts with making a triangle. Making the triangle with three equal sides is convenient, and two of the corner points are easy to locate along the horizontal axis, one at each "end" of the triangle's base. Getting the third point so that the sides are actually equal takes a little math. Using a 100mm side is both a convenient size and makes for a helpful math trick, too. The calulation to find the "altitude" (height from any side to the opposite point) is determined by using the formula sqrt(3)/2*side (which I conveniently found at Wikipedia). For a side of 100mm, that comes out to a rounded value of 86.6mm and it very conveniently can also be used as a multiplier of 0.866 times the side since that's a "percentage". That's why I starting with 100 as the size for a side. Change to 80mm for the side and that puts the top point at 80*.866 or 69.28. Math is cool (and useful, too) when you learn some of its tricks.
Once you know the three points of the triangle, choose the way you plan to make the triangle. An extruded polygon would work, but it is not as good looking, and would have less hand-friendly sharp edges. After some experimentation, I chose to make it by putting a hull around six component elements. Three short cylinders form the base. Three spheres of the same radius as the cylinders get put directly above the cylinders to create a nicely rounded edge for the top of the game. Deciding on the size the triangle is up to you, but values between 80mm and 110mm work on my Lulzbot Mini printer.
hull(){
translate([-tri/2,0,0]) // tri value is the length of a side
cylinder(1,rounding,rounding); // rounding value is the radius
    translate([-tri/2,0,thk])
    sphere(rounding);
translate([tri/2,0,0])
cylinder(1,rounding,rounding);
translate([tri/2,0,thk])
sphere(rounding);
translate([0,tri*.866,0]) // equilateral appx.
cylinder(1,rounding,rounding);
    translate([0,tri*.866,thk])
    sphere(rounding);
}
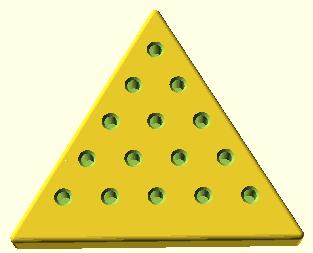
The next step is making holes for the pegs. There are rows of five, four, three and one hole(s). I did want to use a nested for loop for the job, but it was beyond my current skills, but I really didn't want to manually position each hole (though that would have worked, too), so I used some of my failed loop controls in part. Offsets were helpful for both the horizontal and vertical hole arrangement. In the end it is a compromise between automation and manual control. See the code just below.
module hole() {
    translate([0,0,2])
    cylinder(10,holesize, holesize); // main hole
    translate([0,0,thk])
    cylinder(2.1,holesize,holesize+1.5); // taper at surface
}
difference(){
    triangle();
    for(k=[0:1:2]){
// row 1 (five holes)
translate([hoffset*k,voffset,0])
hole();
translate([-hoffset*k,voffset,0])
hole();
 }
// row 2 (four holes)
translate([hoffset/2,voffset*2,0])
    hole();
translate([-hoffset/2,voffset*2,0])
    hole();
translate([hoffset/2+hoffset,voffset*2,0])
    hole();
translate([-hoffset/2-hoffset,voffset*2,0])
    hole();
// row 3 (three holes)
translate([0,voffset*3,0])
hole();
translate([hoffset,voffset*3,0])
hole();
translate([-hoffset,voffset*3,0])
hole();
// row 4 (two holes)
translate([hoffset/2,voffset*4,0])
hole();
translate([-hoffset/2,voffset*4,0])
hole();
//  top row singleton
translate([0,voffset*5,0])
hole();
}
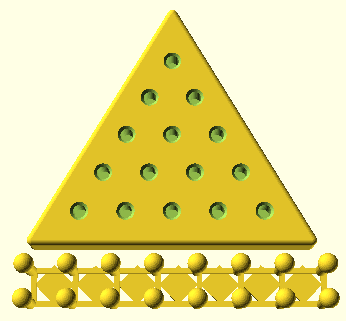
The last bit of this design is the pegs. I wanted to be able to easily show them in the start position or in a print configuration. You may note that you only need 12 pegs to play the game. So you have extras, the design includes 16 pegs. You might want to print the triangle alone, too and the pegs alone, especially if you want to use contrasting colors. Of course, you can print the whole thing once in blue and then again in red and swap the pins from one print for use with the other. That will be up to you.
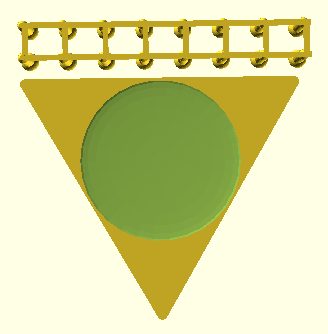
To get several display/print options in one SCAD file means using a "switch" value. In this design, that's the variable "display" to which we can assign four values. Different sections of the program come into use "conditionally" using OpenSCAD's if command in order to execute only the parts of the design we want.
- display=0, print version pegs and pins
- display=1, only pegs
- display=2, only triangle with holes
- display=3, show pegs in place for demo image
Of these options, the most probably "useful" is the zero option with which you actually print the whole puzzle.
Examine the whole program to see how the final version puts code sections in a structured order. Please understand, too that the final version is the fourth round. Earlier rounds concentrated on figuring out different individual parts, and they were not actually developed in the final order which display controls. I don't recommend trying to do "elegant", structured code until you have the working parts figured out. Get the parts to work by themselves and in combinations. Do final structure last, if possible, so they look pretty. Well structured code is going to be easier to follow, even for yourself, as you look back on it, months or years later.
You may actually think the code isn't put together as well as you could do it. That is great! In fact, I suspect that the use of "nested if" structure could make this code even more elegant, but I won't delay this release in order to test that challenge.
In order to make the print easier to remove from the print surface (generally a good idea), the final step was to hollow out the flat base a bit. It took a bit of fiddling, as usual, to get it located just right so it will not cut into the holes or run over the edges.
module triangle(){
    difference(){ // base release hollow
hull(){
translate([-tri/2,0,0])
cylinder(1,rounding,rounding);
    translate([-tri/2,0,thk])
    sphere(rounding);
translate([tri/2,0,0])
cylinder(1,rounding,rounding);
translate([tri/2,0,thk])
sphere(rounding);
translate([0,tri*.866,0]) // equilateral appx.
cylinder(1,rounding,rounding);
    translate([0,tri*.866,thk])
    sphere(rounding);
}
translate([0,tri*.29,0]) // base release hollow
scale([3,3,.1])
sphere(tri*.1);
}
}
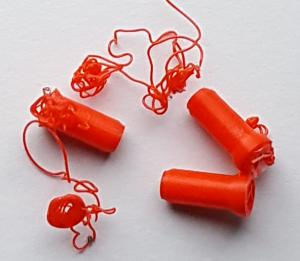
OOPS! While printing the first complete test, the pegs began to fall over as the print head was doing the tops of the pegs. The separate tapered bases were not held tight enough on the print bed while printing the peg domes. There was too much lateral drag, and the pegs gradually broke free of the print bed. Then, as you can see, we get lots of squiggly filament. Ugh. It was a pain to clean up.
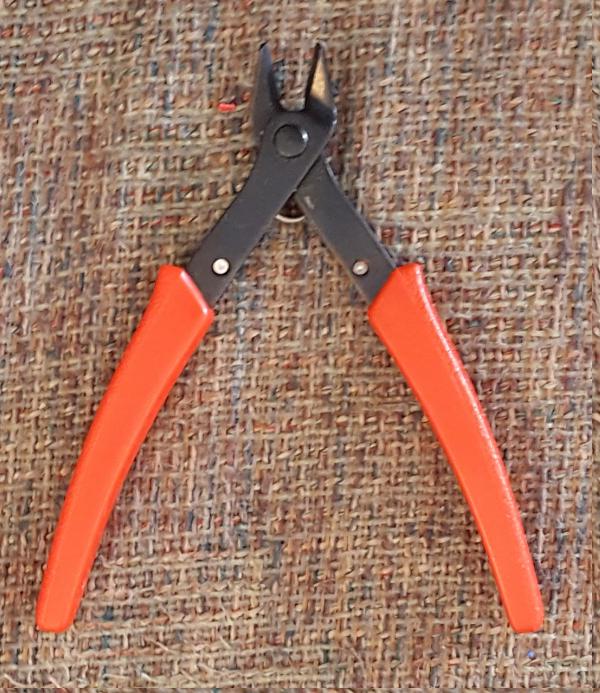
Adding a connecting support grid to the pegs, linking them together to make them stick to the print bed better fixed things. The pegs, with the interlocking grid, stiffen each other and behave as a single item instead of 16 separate, fragile, pegs. It is easy to use little nippers to cut away that support.
The images in this web page reflect the presence of the lateral supports. For the record, I'd been working on the page during the testing phase. The intent of presenting this information is to point out that no project is really "finished" when we think it is. Your experience may not be the same as mine, but I try to be willing to accept hiccups and mistakes with calm, deep breaths instead of ranting and swearing.
Available Files:
SCAD files for study/modification and STL files for quick prints
puzzle05.scad - puzzle05.stl - appx. 2hr 45min to print on Lulzbot Mini - 4.44 meters (35 grams) of 3mm filamentpuzzle05-trionly.stl - puzzle05-pegsonly.stl (separate 100mm files)
GPL3 License