Chess Pawn

Those among you with sharp eyes, or maybe big monitor screens will note that the two images at the right are not quite the same. The photo of the blue pawn was an earlier design. Even simple designs like this one may go through changes from the beginning to the point when you are satisfied.
The pawn is a stack of simple shapes done one above the other. There is just one tricky part, using the difference() command to remove the bottom of the larger sphere forming part of the base.
Let's look at an early version of the code. As you read through to the middle of the code, you can see that it is a very direct, linear program. Building up from the bottom toward the top. I began with a short cylinder, wider than the rest above it to establish a solid base. Moving up with the translate([]) command, the next two cylinders are just a little smaller to ease into the next part. The sphere(9) was just the right size to complete the base, but the bottom of the sphere hangs below the x/y plane. That will not work well because the x/y plane is the equivalent of the printer's print plate surface.
cylinder(1,10,10);
translate([0,0,1])
cylinder(1, 9.7,9,7);
translate([0,0,2])
cylinder(1,9.4,9.4);
translate([0,0,3])
// making the sphere and removing the extra part of the sphere
difference(){
sphere(9);
    translate([0,0,-9])
    // remove the section of the base sphere below the x axis
        cylinder(6,9,9);
        }

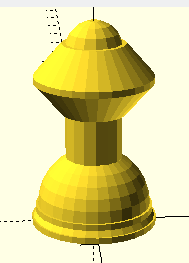
The 9 unit sphere (typically the unit is millimeters) hangs down 6mm below the x/y plane as shown in the image to the right. Using the difference() command cleans things up with a cylinder to match what needs to go. Note that the cylinder here matches the sphere diameter, though it would be okay to make it wider. The excess does not add on. If the cylinder were any smaller (narrower), though, and you would only take a tube out of the bottom of the sphere. I recommend that you experiment to see how this cool command works. Even a centered cube bigger than 18mm wide and 12mm tall would have worked. Try it. translate([0,0,-9]) cube([18,18,12], center=true);. I point this out to emphasize that the dimension of a sphere is measured as a radius by default. Whatever shape you delete must be set up right. For a cube, you'd need to match the diameter, not the radius. That is why exploring OpenSCAD with many of the basic shapes is important during your early experiments.
The rest of the program just continues to stack the parts up.
The cylinder(height,base radius, top radius); command allows for cone shapes in addition to straight-sided cylinders. Just make the first or second radius value different from the other. Explore.
// center shaft
translate([0,0,3])
cylinder(15,4.5,4.5);
// cone widening-shaped cylinder
translate([0,0,18])
cylinder(5,5,9.4);
// cone narrowing-shaped cylinder
translate([0,0,23])
cylinder(5,9.4,5);
// top
translate([0,0,28])
sphere(4.5);
I strongly recommend you launch the Cheat Sheet in your browser from the OpenSCAD Help menu. It will help you check the details of a command as you are learning to use it. Memorizing works best for me when I repeatedly use a command, not just by reading the command specification once. If you can learn how something works by reading about it once, I envy you a lot!
One thing that I needed to understand was that the translate([]) command only had an effect for the shape immediately after it. To move a shape up, I had to do a translate command with just the right value to put each part into the stack where I needed it. At this stage of my learning, I had not encountered the "module" concept which can make a translate command re-position a complex of parts.
Now to the nitty-gritty. The code above wasn't the final version. It was close, but when I handled the pawn, I thought the edge where the cone cylinders meet in the middle was too sharp. (It's the version of the photo at the top of the page.) The final version adds a short straight-sided cylinder to make the pawn more comfortable to grasp. It's the final code I'm providing with the links below.
I tend to keep a copy of most stages of a project's development. I save the first as project01.scad and the next version as project02.scad, etc. Sometimes I get all geeky and save my first as project00.scad. Having early versions around allows me to go back and get a good idea that was lost during all my other changes. When, and if, I get around to publishing code (as done here), I may only name the file project.scad though the comments in the code may show that it went through several developmental stages.
Note:
This code does not include the curve-smoothing variable $fn. You may want add it, if it makes your final design better. The $fn=value; variable determines the number of "facets" used to make a curved solid. The smaller the value, the more blocky a sphere or cylinder will look. Experiment. Check out how the three related variables $fa, $fs and $fn interact.
Available Files:
pawn02c.scad - open and examine the code in in OpenSCAD or any text editor.
pawn02c.stl - for those who just want to print the pawn
GPL3 License