In the previous section, you practiced creating a basic word processing document. Maybe you created several. Good for you. The more you practice any set of skills, the more habitual they become. Good habits make using your computer more fun.
In this section your main goal will be to get back to the file(s) you saved earlier. Pretend, if necessary, that you took the day off and are coming back to get the files later in the week. You might want to add to the work you saved last time. Adding to or modifying a document is called "editing." It is considered a good idea to write without spending too much time trying to make everything perfect. Going back to re-read a draft gives you the chance to look at the work as if you were a different person, sort of like being the person to whom the document might be sent. Trying to edit during the first draft is distracting.
Note that some people prefer to go back to a document by first opening LibreOffice Writer. Once you have done that, you can choose to open either a file by name or to see if it is in the Recent Documents list. The reason that this technique isn't mentioned FIRST because if you're working at the Senior Center, you are using a shared computer, and it could be very hard to find "your" recent work in the long list of saved documents.
By using a different method, finding where you saved the draft is generally easy.
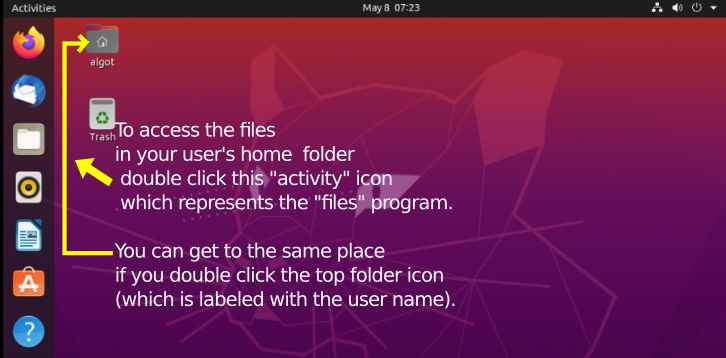
Every time you start Ubuntu, you'll expect to see the main screen. Accessing a list of your files is a quick double click away.
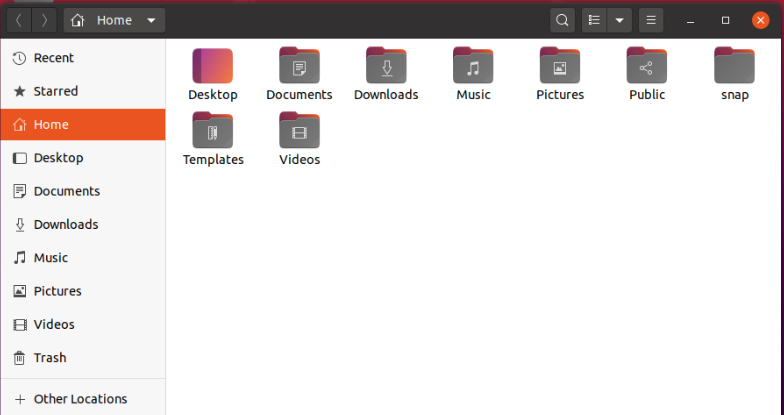
Lets take a look at the folders that are set up by default on Ubuntu. All official “registered” users with an account on a computer running GNU/Linux have a set of folders created when the account gets added. Each user has a main user folder, matched to the user name chosen when the account was created. If you have only one user, that's it, but in busy families, each user can have separate space, kind of like having a drawer of the desk assigned to you. All user folders are isolated from the folders of other users. Each user has a login password so overall access to their work is secure from other ordinary users (unless you gave them the login password). Some people think of the user folder as their “home” folder, and that is what the GNU/Linux operating system calls your space, too. Inside the Home folder you will find all the standard folders shown below. They are named so you will be encouraged to store the right kinds of files in each folder. You would save your letters and other written documents in the Documents folder. Likewise, you would expect to put pictures from your camera in Pictures, song recordings in Music, etc.
Note:
If you are working on your own computer instead of the shared computer at the Community-Senior Center, you may be lucky enough to click "Recent" in order to get a list of files you did recently. In a shared environment, that's probably not practical, so we will concentrate on a more generic approach.
In the following image, for now, concentrate on the main section of the window. The left hand column is something to fully explore later.
Folders:
Ubuntu has prepared a set of top-level folders to help you organize your files.
Word processing files generally go in the Documents folder. You may also hear the term directory used instead of folder. Either way, it's a good habit to break down your storage into logical "places".
Avoid using the Desktop folder for files so it does not get cluttered. The Dash is a better place to keep launchers for Software.
Typically, your browser will automatically choose Downloads when you save a PDF or other file from the Internet.
People typically decide to store photographs in the Pictures folder.
For the moment, let's continue to work in the Documents folder.
Try to develop good habits. Put files into logical folders. Make them easy to find. Of course, since you probably have your own personal computer, (PC) you can do what you like about folders. Scatter them anywhere you want. Just don't ask somebody else to figure out your “system.”
To get to this screen, go to the Dash now and open the Home folder.
 |
If necessary, go back and review the steps of moving the pointer to the correct icon, and clicking the icon to get the window of the file manager to open. |
You are about to run into an “issue.” Click the Documents folder icon. The only thing that happens is very subtle. The name of the folder becomes highlighted. A single click highlights and selects the folder. To actually open the folder takes two steps. You may double-click the folder icon to open it and change focus to the inside of the folder. Compare the next two images to see the subtle difference. The right hand image shows the “selected” folder. The folder name is boxed in gray. It is ready to be activated/opened.
 |  | Click an icon once to select (highlight). Double-Click to activate. |
Practice: Gently click (just once) a few of the different folder icons. Watch as one after another gets highlighted. To select NO folder, click the background next to some folder, but not too close. Most Icons have a bit of an invisible wide border making it easier to click them. If you accidentally open one of the folders with a double-click, that's no problem.
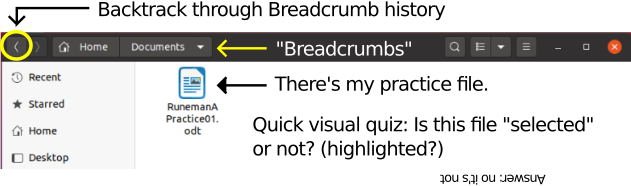
There are three ways to get back to focus the window on the Home screen/folder. In the image below, notice the Home label along the top edge, above the practice file icon. The top stripe shows a “breadcrumb” trace of the folders you've opened. Clicking the Home icon retraces your steps. Just click that icon and your focus will leave the current folder and go “up” to the Home folder again. There is also a Home icon in the left column. The left column is a kind of “table of contents” for your computer. The left column lists the main “places” where information can be stored. This guide will come back to that column later, because there is always more to find out.
Remember you can't expect to learn everything all at once. Be patient. Don't rush. Don't stress yourself. Learn in small increments.
You could also click the left-pointing arrow (circled in yellow) that is at the top-left corner of the window. That arrow is an icon representing “back.” In this case, back means “go to focus on the Home folder.”
Practice: Repeat, retry, experiment, explore. The more you practice, the better your skills will become.
A keyboard devotee might decide to use the Enter key as the way to “activate” the selected folder or file.
Most people choose to get used to using the mouse for a double-click. Relax, in case that takes some practice, too. You need to hold the mouse gently, not in a death grip. You need to tap on the left mouse button twice in less than a second. If you consistently have trouble with making double-click work, ask for help setting the click speed in the System Settings tool for the mouse. We won't take that detour at this point in the guide. Look in the appendix for more details on System Settings.
Go back to double-click the Documents icon, please. We need to see the icon of your saved practice document. You need to open the Documents folder to focus on what's inside.
To edit a document, you need to open it. The document needs to be active within the window of your LibreOffice word processor. Double-clicking the name of a file will do two things. The word processor will start and the window will display your document. Double-click the icon of your practice file.
Double clicking the icon of the practce file will do two things. LibreOffice will launch and the window will automatically open to show you the text you wrote and saved earlier.
Launching a program that is designed for the kind of file is a feature of the operating system. Each type of file is associated with a program that can understand its storage format.
When you have opened the Documents folder, you should see your practice file listed. Normally, the files are in alphabetical order. You will probably notice that this view of the Documents folder is extremely sparse. I created a new user just to write this guide. This is the very first saved document that I'm opening again.
 Note:
Note:
At some point, you will find yourself double clicking on a file whose storage format is not linked to a program you have installed on your computer. We're not ready to get into that issue yet.
Don't be flustered. Back out of the situation. Most often the way to back out is to tap the Escape key. Tap the escape key to back out of other paths you no longer want to follow, too. For example tap the Escape key to close a menu you have clicked but don't want to explore.
 (Oh, yeah, the Escape key only has "Esc" on it.)
If you saved more than one practice file as you worked on the last section of this guide, take the time to open and close a few of those files.
OK, after you have re-opened your document, you begin the official “editing” phase. A good work flow is that you type a first draft, and then save, and then go away to rest your mind. When you come back, you'll see the words more judgmentally. Please get used to the need to save your changes. Until you save your changes, they are not recorded in long term storage on the hard drive. Some people get in the habit of clicking the save button every ten minutes or so. My version of LibreOffice also has an autosave function built in. Every 15 minutes, LibreOffice saves the current state of my document so if the computer crashes, I can get everything but the last fifteen minutes of work back. A computer is said to “crash” when the electricity suddenly shuts off. People also say a computer crashes when there is an internal error that makes at least one tool stop working. Fortunately, crashes are rare. It's a good idea to save regularly, though.
An important thing to remember is this:
An open/active file that has not been saved is temporary. It is only on the screen and in the impermanent RAM of the computer's memory. RAM stands for the term Random Access Memory. Use the three letter acronym, though. Everybody does. Here's the thing about computers. Everything that you input gets stored by turning switches on or off. The letters you typed are stored by a set of eight switches. The switches are extremely tiny. You couldn't see them if you opened the case of the computer. These switches are electronic, too, except for the one that turns the computer on or off. That switch is big, physical, obvious. It is very important to understand, though, that when you turn off the computer with the big, visible switch, all the other tiny, electronic switches also go off. The switches are built into components called transistors or integrated circuits or simply chips. Don't bother to try to look at them. Millions of the tiny switches are sealed in rectangles of plastic.
When all those tiny switches go off, the codes which have been entered by your typing on the keys of the keyboard, those codes go to zero, all off, gone!
That is why you need to save your work once in a while. Saving makes a copy of the codes. You get a recording called a file on the hard drive. Each electronic code-switch is recorded as a tiny magnet. Each magnet has its north pole either pointing up or pointing down. The magnets don't change unless told to. A copy of your file on the hard drive is a stable, long term record of your work. Read more details in the hardware appendix.
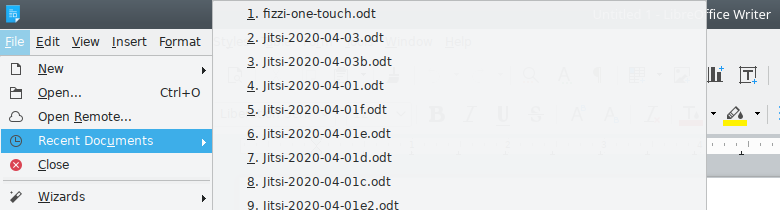
Each time you save the file, the hard drive copy updates to have all your changes. If you don't save regularly, you will lose your changes when you turn off the computer.What if you want to make a bunch of changes, but do not want to lose your original version? That is easy to do. Instead of just clicking the mouse on the Save button, click the word File in the top row of the LibreOffice window. You will see a bunch of options in this menu. A menu is a list of options with a common purpose. The File menu offers options related to the whole file. Here's the top of the File menu on my LibreOffice word processor.
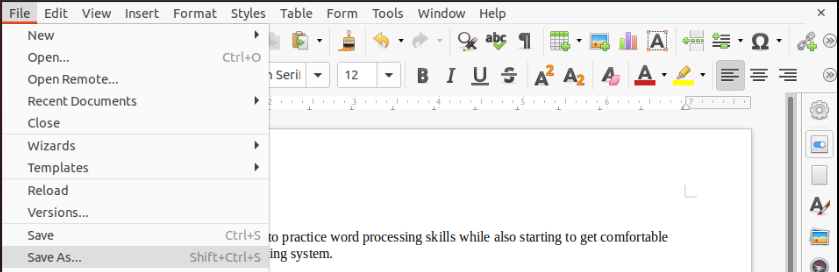
Save As...
is a File menu option which lets you give a new name to a new file copy you put onto the hard drive storage. You may want to make several versions of a novel chapter as you work along. You and your editor may exchange versions.
The option is highlighted in the image of the top section of the File menu at the left. The rest of the long list of options is chopped off to let you focus on the current concept.
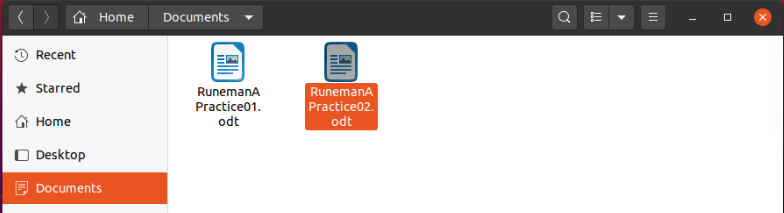
LibreOffice should show you the same Documents folder where you saved the earlier version. Just change the name to show a version number: something like, RunemanA-Practice2 maybe.
OK. While we're looking at the menu, Let's introduce a new bit. Look at the bottom two options in the earlier file menu illustration above.
These are keyboard shortcuts. Some people prefer them because they find them faster to use than the mouse. A keyboard shortcut lets you keep your hands on the typing keys instead of moving over to the mouse.
Here's how it works. To use the Save shortcut for a new file, you hold down the Ctrl (control) key. Keep it down. Now, tap the letter S (no need to capitalize). Then let go of the control key. The dialog window for saving should appear just the way it did when you used the mouse to click the save button. The keyboard shortcut means the very same thing to the computer as the mouse click on the button. Ctrl+S for a file already saved will just show a moving color progress bar at the bottom of the screen.
Go ahead give it a try. Make some small change and then Save your current file with the keyboard shortcut. Did you notice the progress bar? It may have been quick. The progress bar briefly takes the place of the status bar. The status bar shows a bunch of document details. The guide will describe them later. But here's a quick image of the status bar taken while writing this guide. If nothing else, it makes a nice divider line in the document.

The keyboard shortcut for Save As... needs more fingers. You start by holding down the Ctrl (control) key. Keep it down. Now, also hold down the Shift key. With a third finger, tap the S on the keyboard.
OK. Take a deep breath. If the mouse works better for you, great. Use the mouse.
Only use the keyboard shortcuts you find to be more convenient than the mouse action.
When you read about a keyboard shortcut in a manual, file it away that, “There are keyboard shortcuts for some of these tasks.” Whatever you do, DO NOT MEMORIZE a list of them. (This guide has an appendix of the keyboard shortcuts for several tools.) Working with a computer is not supposed to be a rote process. You should think about habits not memorization. You develop a habit by doing something over and over until it becomes natural. Touch typists do not think about the way their fingers move individually. The fingers seem to just “know” what to do. That is what you want with all of the things you practice with your computer. Go over the tricks as you work. Use the ones you want. Almost without any thought involved, you'll find your fingers reaching out to do the right thing. Some people choose the mouse habits. Others choose the keyboard shortcuts. It is your choice. Relax.
One last things about the Save As... option. You might have noticed the three dots after the option. Those three dots are intended to let you know a dialog window will pop open, giving you the chance to enter more information. The Save option only gives you the dialog window the first time you use it. A simple Save from then on “silently” updates the hard drive copy with no need for a dialog window. The file name has already been decided.
Look for the three ellipsis dots in other options to let you know there will be more to enter before completing the menu option.
The next section of activities is designed to help you develop good word processing habits. Read about the actions. Try them. Some you will get the chance to use every time you write a document. Let the frequent action steps become habits. For the tasks that come along less often, rely on the menus to remind you what is possible. If a button tooltip or menu doesn't remind you, then rely on cheat sheets which you have made, then rely on help from guides like this or similar ones on the Internet. Finally, remember you can ask another human to give you a bit of help. Don't be shy about doing that. Become a participant in a group like NatickFOSS where you'll find friendly, helpful support. You can also go to computer lab time offered at the Community-Senior Center or the library. Computer labs like those are designed to make getting help easy.
© 2013- Algot Runeman - Shared using the Creative Commons Attribution license.
Source to cite: - filedate: