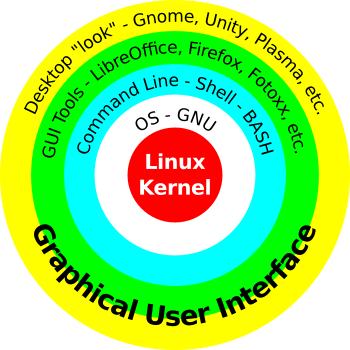

Beneath the pretty colors and buttons of the Graphical User Interface (GUI), there are programs, often with short, cryptic names which do the work of guiding the computer to do its job.
I visualize the software on a computer as being something like concentric layers...The outer two (yellow and green here) are the GUI.
Current computer users mostly see and interact with the layers of software through mouse clicks, program windows and menus which we know as the Graphical User Interface (GUI). There's more "inside" that. A lot of very effective computer users don't use it, but the Command-Line Interface (CLI) does underlie all of our colorful, interactive computer activities. Some users do find the CLI easier, and in many ways it is the best tool for a whole bunch of advanced tasks.
Let's take a look. The image below shows how the terminal emulator looks right after you launch it. A terminal emulator is the window where you will be directly typing commands for the computer.
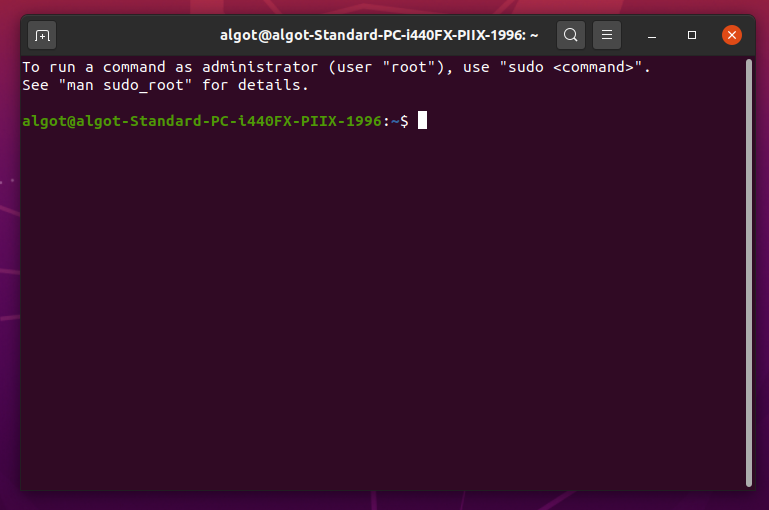
Most people launch the terminal (and rarely say "emulator") with a three-key keyboard shortcut Ctrl+Alt+T, holding the first two keys down while tapping the third.
The first command people generally learn to type is ls followed by tapping the enter key. ls means "list", but has always been abbreviated since the days when people actually were working from a keyboard far away from the main computer to which they were sending the command. Abbreviating made sense to the early computer pioneers and it took less work to type just two letters instead of four. It also used a smaller part of the slow connection between the keyboard terminal and the mainframe.

More detail:
The command line has several important parts which are color-coded in Gnome's terminal emulator.

When you type ls, the letters will appear in white as you type them, and when you tap the enter key, you'll see a listing of the current user's (you, when you logged in) home directory, which mainly has other directories in it. The names of directories appear in blue text. Like the earlier squiggle/tilde, the blue indicates the name refers to a directory. In the illustration, there is a single name which is white, "contactlist.ods". White text is used to show that it is a simple file, not a directory. In this case it is a LibreOffice spreadsheet file (note the .ods extension). Frankly, It's my opinion that the spreadsheet file ought to be in the Documents directory. Keeping documents "up" in the main home level of directories isn't good practice.

Laura M. says, "I don't like the colors...the list is too hard to read."
For me, too, the blue-on-black for directories is hard to see.
Temporarily turn off the list colors with ls --colors=none
There's also a way to turn off the colors permanently. Read more in this article: Control BASH Colors
For experienced users, the tilde is enough clue to know which directory is the one you're looking at, but you can also type pwd which stands for "print working directory". Yes it is almost sensible as an abbreviated command. If you spend much time using the CLI in your computer journey, you will begin to "know" the commands you use. In that way, it is like using the keyboard shortcuts.

Knowing the names of files in a directory may not be enough information, so there's a variation of the list command ls -l which displays a "much" more detailed list of information instead of the compact list of the basic command. The variation means "list long" and there is a space after ls followed by a dash and the letter l again. -l is a command "option". The dash is the signal for which option to use.
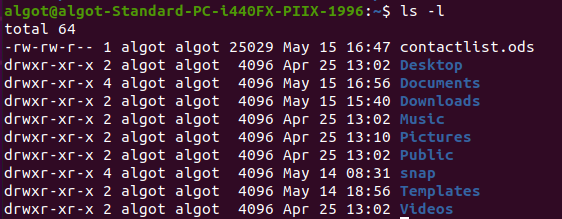
There's almost too much information in the long list.
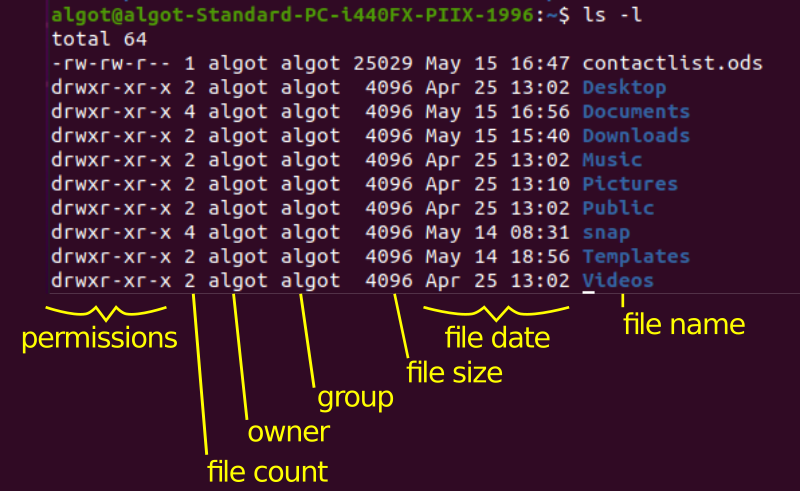
The standard list command shows files in alphabetical order. Using the options can change that.
Wait, I need to know the year the file was modified!
The easy terminal command is date -r filename. The date command, used alone, shows today's date. With the -r option, AND the filename, the result looks like this.

Details, Details and More Details
Can't I study this later?
Of course. Learning any part of how a computer works is NOT A RACE. Take your time. Bookmark this page and come back. Or maybe, skip ahead beyond this explanation box.
Let's begin with the basic file:
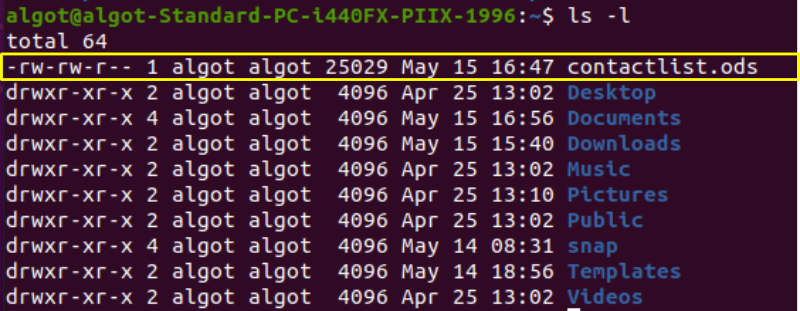
We'll look at the simpler elements first.
It is a file owned by algot (me). He's the person and the account which created the file.
The default group is also algot since this is a single user computer. Files on a shared computer are often assigned a group with LOTS of users able to work on the file.
The file size is 25029 kilobytes (not too big).
The file date is May 15, 2020 at 4:47PM (though the time says 16:47 because computers use 24 hour clocks).
The year does not show, either. The date shows the last time the file was modified (which may also be the creation date).
Now let's go back to that first bit, the permissions:
Each letter in the permissions tells a story.
There are three main permission groups: owner - group - others.
Files are not directories so the permissions of "d" don't apply.
The owner can r read the file.
The owner can w write to the file (save).
The owner cannot x execute the file (it isn't a program).
Group members can read the file.
Group members can write to the file.
Group members cannot execute the file.
Others have the fewest permissions, just read access (and this permission can be changed to remove that).
---oh, and that number after the permissions, that's the number of hard links to the file. Simple files usually only have one hard link.
For the directories (which are considered just a kind of file), the permissions include the leading d because we need to know it is a directory (I'm glossing over some more detail here).
The directory needs to be marked with an x for anybody who has permission to look into the directory!
The second command most people learn is cd which is short for "change directory". In the example below, I've typed cd, a space and the capitalized name of the Documents directory. (Remember, capital letters matter in file names and directory names. If I had typed "cd documents" there would have been an error message: bash: cd: documents: No such file or directory) We are now one level "down" in the stack of directories. If you look in the image below, you will see two words in blue: "business" and "personal". Those are directories inside the Documents directory. Each directory "in" another is also a level "down" from it. Using cd over and over, you can "drill down" into your "tree" of directories until you locate the file you want. (Whew!)
(If you've been used to thinking "folders" in your GUI work, "directories" mean the same thing.)

If you change directories "down" a level, there's an easy way to change back up. Type cd .. The two dots mean "up one level".
Note:
If the lists are long enough (after you've used a computer for months or years, the files do collect) the ls command will show you only the last screen-full of files. Because we are using a terminal "emulator" we do gain a little benefit from the GUI. you can use the mouse to drag the scroll control on the right edge of the terminal emulator window (or the mouse scroll wheel) to see other parts of the list.
Advanced users who use actual remote terminal connections need to learn even more CLI commands than the casual explorer.
If you know your way around the Ubuntu/GNU/Linux file layout, you can specify an exact directory location. A lot of the spots we can explore are NOT part of most people's daily routines. However, if you're intent on pushing into complete computer dominance, you'll need to try things like cd /usr/etc where you will find lots of configuration files for the installed programs. At this time, it is probably wise to avoid changing anything at all which is NOT in your own home directory.
To go back to your own home directory, type cd ~/ to get back on more familiar and SAFER ground.
Before taking on more details about using the command line, let's revisit why a person uses the CLI.
Among those reasons, and maybe more, the only reasons which actually fit the purpose of this guide are the first two. If your intention is to become a programmer, a software engineer or a system admin, then you'll need to study much more deeply than these paragraphs can take you.
Most of the time, we will probably decide to use the GUI for the next several tasks, so we're entering, at least, "I want to know Unix-style" territory.
There's no drag and drop, of course. That's the GUI. This is "Type it yourself."
You need to specify things in a specific order: command - file to copy - copy to make -> cp contactlist.ods contactlist2.ods
(List the directory again with the ls command to see that the copy is there.)
You could also decide to copy the file into the proper place for it, the Documents folder. cp contactlist.ods Documents/contactlist.ods (Be sure to notice that the slash (/) is required and that there are NO SPACES in the "target" directory/name.)
Go ahead cd into the Documents directory to see if it's there. You can also do a tricky version of ls: ls Documents which lists the files there without needing to change into the target directory.
Spaces
Speaking of spaces, some people are used to putting spaces into file names...Traditionally, spaces have been discouraged. People "in the know", traditionalists, use dashes-between or underscores_between the words (maybe even CamelCase). If you have files with spaces in the name, you will need to use quotation marks like this: cp 'file name.ext' 'file name2.ext'. Helpfully, the terminal "understands" the quotation mark convention and will show files with spaces in between single quotes. Being a traditionalist, I still recommend others "be like me" and hope you will NOT use spaces in file names.
Of course, if we only wanted the contactlist file in the Documents folder, copying it there would not be the best thing to do. "Moving" it there makes much more sense.
The command to move the contact list file into the Documents folder is: mv contactlist.ods Documents/contactlist.ods
Warning!
There's a huge "Gotcha!" with the mv command. If there's already a file in the new location with the exact same name, it will be over-written with NO WARNING. The GUI drag-and-drop warns us. That's probably what we are used to. It does not happen here, and there is NO UNDO!
There is a "sort of" way to get protection. Type the "interactive" version of move. mv -i contactlist.ods Documents/contactlist.ods Using the -i option will produce a somewhat helpful message: (tap the letter N to NOT overwrite - tap Y to go ahead and overwrite.)
mv: overwrite 'Documents/contactlist.ods'?
Please use this command with great care. If in doubt, always use it with the -i, interactive option: rm -i filename
This command is even more dangerous than the move command. The command rm means you are "removing" a file. When you use this command, the file you identify is GONE! Type carefully. Practice on files you can lose without any issues. Maybe use LibreOffice Writer to make some fake files with obvious throw-away names like "garbage1.odt", "garbage2.odt", etc.
One piece of good news is that you cannot accidentally use rm to delete a directory. There's a totally separate command, "rmdir" for that. Look it up, if you want to pursue it.
One way to look up commands (maybe the least helpful for novices), which is part of the CLI, is the command man rm which launches the "manual" for the rm command (command format: man and the name of any command).
When you invoke the manual, you are launching a program at the command line. You are NOT at the command line while you are "in" the manual. Tap the letter Q to quit back to the command line.
Frankly, it the age of the Internet, a good net search is, most often, going to give you clearer answers. Man pages are very concise, blunt, sometimes hard to read. And if the first Web link you check isn't too good, check the next, and the next until you learn what you need. Man pages are what they are. They were written by and for people who are comfortable with the Command Line Interface.
Most of the time, while working along with the terminal window, it is convenient to be able to scroll back to look at earlier commands and their results, but occasionally we may want to start fresh. Typing clear gets us an empty terminal window, ready for a fresh start.
Most of us let the operating system inform us with a taskbar notification icon when updates are available. My computer automatically checks for updates once a day. Yours probably does, too.
I then, normally, use the GUI
Once in a while, "Ubuntu Software", the "store" does not have a listing for a program you want, so you follow directions from the Internet guides. They tell you to use the apt command, AND you also need to switch to the "root" level of control. The preliminary sudo launches the apt command as if you were the Super User, AKA "root" user. You'll need to enter the primary user password which you set up when you installed Ubuntu.
You will not see any indication of what you type.
There will be NO nice row of dots: ⚫⚫⚫⚫⚫⚫⚫⚫.
Type carefully.
sudo apt update
A bunch of internet activity ensues while your computer contacts the Ubuntu servers to see what's "upgradable" and available. The screen shows the activity which probably will scroll by way too fast to follow. You can scroll back up with the right hand edge scroll control, but in the end, you'll see what a count of upgradable programs which been found and how to see the list (if you wish). Most of us will trust Ubuntu to give us what we need and will just type the upgrade command.
Depending on whether you've delayed, you may need to enter the sudo prefix. If things have moved quickly enough, the earlier sudo still works.
sudo apt upgrade

You'll need to approve the upgrade by tapping Y for yes.

It may take a while to download the files and install them. Most files will be userland components. Occssionally, the updates will be for components of the underlying operating system/kernel. In that case, you'll also be warned that some new versions will not take effect until you restart your computer. Active kernels cannot be easily interrupted from their steady work to be replaced without a computer re-start.
What if I want to see recent updates?
"Under the hood" Ubuntu primarily uses the apt command to do operating system and main program updates. The following command typed into the terminal will tell you the most recent month's update history.
cat /var/logs/apt/history.logIt very well may be that this last section is the one you might encounter most often as you read about fancy, new programs offered for your Ubuntu/GNU/Linux computer.
Fancy, new programs come along all the time. They may take quite a while to get into the Ubuntu repositories, especially the LTS versions. Adding programs from outside the Ubuntu repositories is at least mildly "risky" since Ubuntu wants all the good stuff to be available to you, but it can take time for the packagers (one kind of program developer) to verify the new stuff will work with the rest of the available "libraries" and GNU OS utilities on your computer.
Ubuntu uses the apt command to handle such cases for files which have been packaged as deb packages. Most deb packages are from the "upstream" programmers at Debian, a very important part of the GNU/Linux world. Package maintenance is a critical part of computer stability.
.Reminder:
Always do sudo apt update and sudo apt upgrade before installing any new program, even if you are doing it through the GUI Ubuntu Store. New programs typically rely on the most up-to-date libraries and utilities.
Even then, some programs will require dependencies of libraries your computer does not have. Seek advice. Seek help.
apt install program-name is the format for this command, but look for recommended steps from the program developers. Most new programs have a web site you can visit. Also, think before you act. Get strong recommendations from your local user group or paid consultant. Don't simply rush off to snatch the "flashy new thing", especially if you value your computer's stability. "Bleeding edge" is often the term for the newest software, and it may not be very polished. Sometimes, advanced users will work with programs identified as being in a development stage called beta or even alpha. These are not for you if stability is the first issue for you.
Test beta and alpha software on a secondary computer long before you try them on your primary work computer.
There are MANY more commands which are each single-task executable code/programs. They are used individually at the command line as we've been doing. How many do you need to know? The answer to that question will vary widely as you advance into the realm of an advancing user.
If you want to fiddle with programming, you'll certainly learn to build shell scripts and to run them from the command line using ./shellscript.sh.
What's BASH?
That's the name of the most popular shell (CLI) tool. It is short for "Bourne Again SHell", a modern GNU implementation of an earlier shell language. Bash lets us define sets of commands to be used as short command-combining programs, allowing advanced CLI users to do repetitive command sequences as single commands. This isn't the place to go into those details.
If you have a long, complicated, favorite command to enter over and over, it is not necessary to type it again and again. Throughout my day, I do updates to my journal using a program called pandoc to convert from an easy-to-type text format into HTML, web page format. The command to type is long and has some interesting syntax.
I type pandoc --ascii -t html5 -o journal2020.html 2020*.md
To retype that over and over is prone to mistakes! Fortunately, I only need to tap the up arrow key. That automatically re-types the most recent command I entered from the Bash command history. Even if I have typed several other commands in between, I can use the keyboard up arrow to navigate upwards through the commands I don't want until I get to the one I need. (Yes, the down arrow moves down through the history if I go up too far.)
That asterisk is a totally powerful stand-in character. In my journal folder, I name files day by day starting on the first of January in this format: 20200101.md and since the files are accessed sequentially, all the January entries are picked up in order, then February, March, etc. After that, I can read what I need from my journal in my browser. Pandoc is exclusively a command line tool. It is one of the main reasons I got comfortable with using the command line.
Let's wrap this up for now with a final command.
Even though we are using a terminal emulator which can be closed by clicking the big X button in the top corner of the window, we are emulating a full shell experience. System administrators access remote computers to deal with routine tasks. They use shell access for remote work (typically by using the Secure Shell (SSH) tool/protocol. SSH replaces the older connection commands, telnet/rsh/rlogin that were used to launch a remote terminal connection in earlier Unix days.
At the end of a work session, the remote connection needs to be shut down, closing the terminal. The emulator recognizes it is emulating a real terminal, so if you type exit, the terminal emulator window will close, just like cutting the connection to a remote computer. (For the record, if you establish a shell connection to a remote computer, you will need to log in to the remote computer. Our terminal emulator does not require that because the emulator begins its work "after" you are already logged in to your local computer.)
Clearly, there's a giant space to be explored beyond this introduction. Don't be dismayed. If you have a reason to learn, you can dig in and learn all the tricks. Learning is fun, especially if you let it be.
© 2013- Algot Runeman - Shared using the Creative Commons Attribution license.
Source to cite: - filedate: