Image Credit: OpenClipart
If you have hired a consultant to assist you, that person may have installed optional software that they've found especially helpful. This guide may not cover some things they have planned to show you. This guide will be as generic, "vanilla" as possible describing what a fresh install of Ubuntu Unity (version 12.10 and later). The skills described actually may be generic enough to transfer to another computer setup.
You may decide to skip over parts. That's fine. Do glance through each section, though. Maybe something will catch your eye which explains a trick you missed on your own. As is true with many things, you can learn by experimentation. Computers are very "friendly" to explorers.
Many things you do with a computer are like on-off switches. You can set options. You can turn off a feature you don't like, but the same switch that turned it off can be used to turn it back on again. You will be able to make settings changes which allow you to customize things to be the way you want them instead of needing to adjust to the default or standard setup. You may want to change the screen's background image, colors of text, etc. Those are things you may eventually enjoy digging into. However, if you are actually starting from scratch, or almost, get to know the standard ways things work. That way, others will be more easily able to help you through issues you have found confusing. By starting with the default settings, you also have less to try to learn right at the start.
The mouse and keyboard are the two input devices that come with a standard desktop or "tower" computer. The other big piece of the computer is the screen or monitor. On a standard desktop computer, the monitor is an output device. If you got speakers with your computer, they are also output for the computer. You add information to the computer through its inputs and get information back out by way of the outputs.
Image Credit: OpenClipart
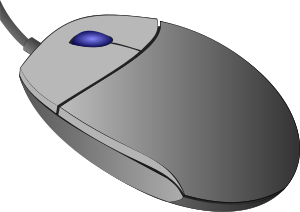
There is mechanism using light or a set of rollers on the bottom of the mouse to sense the motion as you push the mouse on the table next to your computer. The motion causes an electrical signal which goes through the wire and tells the computer to move a pointer on the screen. If you pick up the mouse, the electrical signal doesn't change, so you can lift and re-position the mouse as necessary to move the pointer a long distance. Just pick up the mouse and set it down to drag it around some more.
 This is the look of a basic pointer.
There are many different pointers, though.
Some pointers look like open or closed hands (often when an element on screen can be grabbed and dragged around).

A pointer can get confusing when working with text. You may see a pointer which looks a little like a capital I. You may also see a vertical line flashing on and off nearby. You'll see it a lot and will get used to it. Be patient at the beginning. Remember even these things can be adjusted to make them more visible.

In the image above, the I-beam pointer is to the right and will move around the screen (where there is editable text) as you push the mouse. The line just after the period is going to be flashing on and off (sorry can't show that on paper! The image is an "animated" image on the web page.). That flashing line isn't a pointer. It is called the cursor. You will see it when you work with words in a text processing tool like LibreOffice Writer. A cursor marks the spot where the next letter will go when you use the keyboard. There will be more details about the cursor later in this guide.
Current computers use what is called a point-and-click system for controlling many of the actions you do with the computer. Move the mouse to point at something on the screen and while holding the mouse still, click the left button of the mouse. A mouse for a Linux or Windows style of computer has two buttons, left and right. (If you are using a Macintosh computer, and, a different guide will explain the details better for you.)
Click is a term for pressing down quickly and releasing the mouse button without moving the mouse at the same time. Doing a click takes practice.
I recommend that you try the following. Rest your fingers over the mouse so that your thumb and ring finger (or pinky) gently rest on the desk as you hold the mouse's sides. When you are going to click something, press the thumb and ring finger down slightly to rest on the desktop. When you get the feel of it, holding the mouse this way will keep the mouse and the pointer still so you can tap the left mouse button without jerking the mouse.
Oh, by the way, the wire sticking out of the mouse should be near your finger tips, not your wrist. The wire should be pointing away from you. Turn the page to see how your hand might look as it holds the mouse.
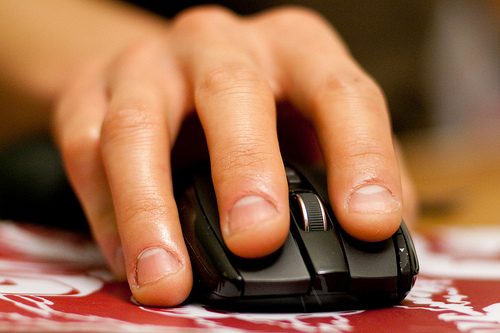
Image Credit: Brian (bmhkim) license: cc-by-nc |
If you are left handed, get somebody to show you how it is possible to switch the actions of the buttons so the "action" button is the right instead of the left. If you are using this guide with a shared computer like the one at the Natick Community/Senior Center, please leave the mouse settings at their defaults. |
The left mouse button shown under the index finger in the picture above is the action/selection button. Clicking the left button (left clicking) causes an action to begin. The right mouse button is used a little less often, but has an important role, to reveal options that are specific to the thing you are pointing at on the screen. Frequently, a context menu will appear for the object you have right clicked.
Practice:
Move the mouse around on the table and watch the pointer go around the screen.
Right click while pointing at different parts or pictures on the screen. See if there is a context menu that appears.
When you have gotten further along, practice with the mouse using both a drawing program and a card game. Both of those programs will let you gain effective control of the mouse.
Some mice have a wheel between the buttons which is used for quick control to move through the contents of long documents or web site screens. This action is called scrolling and a mouse with a scroll wheel is very popular with some users. Either the index or middle finger may be used to flick the wheel ahead or back.
Laptop users do not always have a mouse attached to the computer. Instead, a laptop has a touchpad located below the keyboard.
![]()
Touchpads use the motion of fingers brushing across the pad surface to make the pointer move. Most modern touchpads provide scrolling by flicking a finger along the right edge. Another "feature" of trackpads is tap to click. As you will learn, such features of many parts of the computer experience are options. You will be able to make settings changes which allow you to customize things to be the way you want them. However, if you are actually starting from scratch, or almost, get to know the standard ways things work. That way, your friends with computers or your consultants will be more easily able to help you through things which are confusing. By starting with the default settings, you also have less to try to learn right at the start.
Practice some more. Push the mouse around (or brush around the trackpad) to get the pointer to move all around the screen. The screen of the Ubuntu Unity computer at the Natick Senior Center may look similar to the next image in this guide which shows a fresh install of Ubuntu Unity.
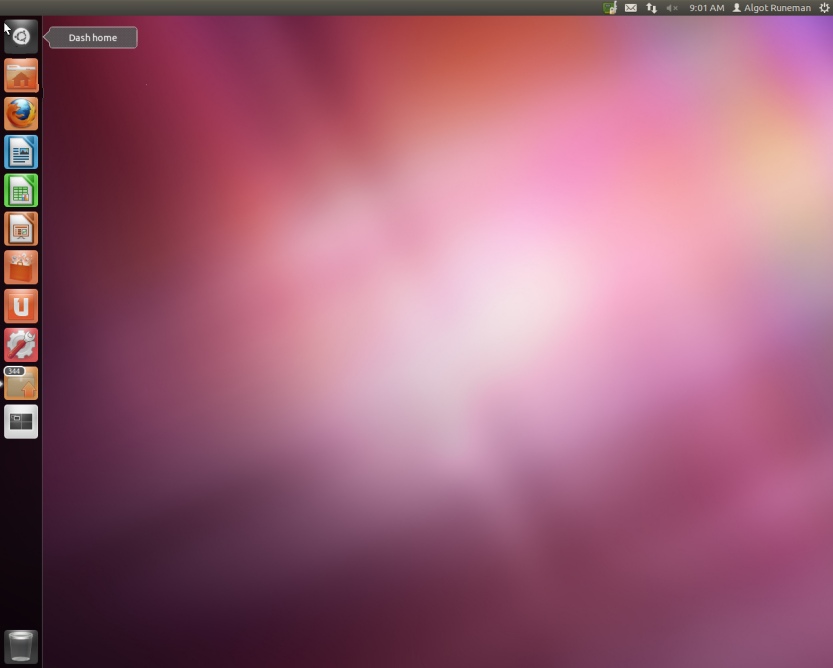
You can push the pointer to hover over the small picture the left top corner. Hover means the pointer is just sitting there on top of the small picture. You hover if you point at something but don't click either mouse button. Sometimes hovering will make a change to the image. In this case, a little message appears to the right of the icon.

The left column of icons on the screen has the name Launcher with several popular application icons ready for a quick click-to-launch. It is a bit like the Start button of Windows. Each of these icons represents a connection, a link to a [tool, application, activity, etc.] When you left-click a launcher icon, you will "launch" into the application and a window will appear on your screen. The window may cover all or only a part of your screen.
Practice: Move the pointer down the column of icons and (hovering) get a first hint from the tool tip message that appears. Then come back to this guide and read more about these standard activity launch icons. (It's a separate linked page.)
Each of the little pictures is special, though. It is called an icon. An icon is special because it represents a potential action (or sometimes and action already under way). If you left click the top icon, the main image of screen will change. A new set of icons will appear. Go ahead try a left click of the top icon in the launcher called the "Dash Home" or just "Dash" which offers quick access to all the other available tools and even materials on the internet which you can explore and later add to your personal set of tools. It should produce a new set of icons in a couple of rows across the screen.
![]()
The Dash icon is also the Ubuntu logo. The word ubuntu is approximately translated to "human kindness" and the circular shape represents three people joining hands to work together in cooperation. Canonical, the South African company behind the Ubuntu GNU/Linux distribution, wanted to help support an international cooperative spirit with their distribution's name.
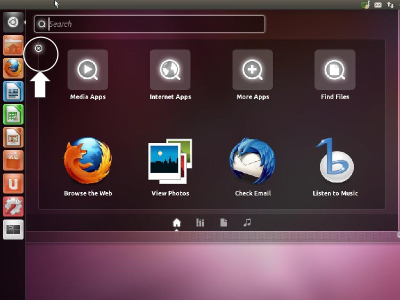
Getting back where you started is important Look for the X near the column of icons. That's an icon for the control of the window which was just opened. A window is a rectangular view which overlays on top of the other stuff on the screen. To close the "Dash home" window (closing the view that the window provides) just move the pointer over and use the left mouse button to click the X. The X in the picture above is circled in this picture (not on the real computer screen) and to make it even more obvious, there's a big arrow pointing at the circled X. A left-click of the X takes the screen back to the nearly empty Desktop. The term "desktop" is used to describe the visual image of the screen. Like a physical desktop in your office, The windows you "open" can be arranged on the desktop to make it easy to go from one to the other so you can focus on one task after another.
Build your vocabulary while you move through this guide. Talk to others about your practice and use these terms. Sometimes your companions will help you use the terms effectively.
Using the mouse in the way described so far, is part of working with a Graphical User Interface (GUI). The GUI is the result of many studies of how a person works when they try to do some job using the computer. The GUI is intended to make it easier, more visual, to do the job. Some people say using a mouse as part of the GUI is "intuitive." They are trying to say that it doesn't take too much instruction or practice to figure out what is going on.
The second input device is a keyboard. You probably don't need too much description of it, especially if you had a typing class in school. Even so, you will learn some keyboard tricks as you go through this guide. Some tricks will save you time.
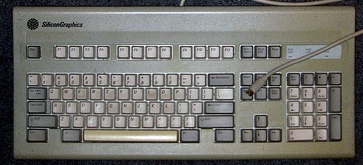
Image Credit: Brian Pitts (cc-by-sa)
Tapping a key on the keyboard may simply make a letter appear on the screen. However, many keys can be used to launch an action in a similar way to a left click of the mouse. Using the keyboard as a command input method has a longer history than using the mouse. Some of you may be aware that before 1984, there were personal computers, but almost none of them had a mouse. The keyboard was the input for everything. It was very common to see keyboards with paper templates stuck on with printed reminders of important keyboard commands. Templates are a good idea. So are notes you make for yourself. Keep them handy for reference. You will use them less as you develop your own habits, but they will help later, too, for the things you only do occasionally. Do not expect to learn everything all at once. Nor should you expect to remember ALL of what you have tried just a few times. "Memorize" through repetition. What you do the most often will become a habit. That is the most effective kind of memorization, way better than sitting down with a list of notes and poring over it. Get comfortable by doing things over and over. Muscle memory is an important piece of working with a computer.
There are lots of things beyond typing words and sentences that you can do with the keyboard. There are many special key combinations you will gradually learn. Don't try to memorize them. That's a waste of time. This guide will tell you some keyboard tricks which will save you time. Try them out. Many of them do the same job as a series of mouse clicks. Some people prefer the mouse click methods while others prefer the keyboard tricks. You get to choose. Learn the ones you like. You will use the ones you like a lot and by using them, you'll “memorize” them. They will become your habits.
One of the best places to learn about using all the mouse and keyboard tricks is word processing. Word processing is more than just a fancy name for “typing.” If you used to use a typewriter, you typed. The words immediately transferred to the paper in the machine. You needed to edit later. Using a word processing tool on a computer still involves typing, but the words don't go directly to paper, they appear on the screen instead.
It is time to jump in for some word processing practice. Move your pointer down the Launcher until you are pointing (hovering, remember?) on the LibreOffice Writer icon shown next. Holding the mouse still, tap the left mouse button. ("left-click", remember?)

[Don't worry, this guide won't always be so redundant. You'll get used to the terms as you use them, not as they get mashed together on these pages.]
© 2013-2016 Algot Runeman - Text in this section shared using the Creative Commons Attribution license. Images noted have separate license terms.
Source to cite: - filedate: