Raspberry Pi Notes
Basic GPIO Steps
The GPIO functions of the Pi require root priviledges, hence, use sudo to create (sudo vi) and execute (sudo python blink.py) the Python programs.
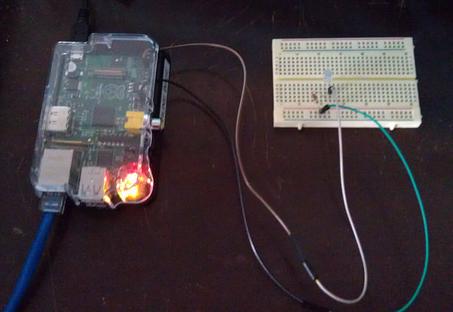
Step 1, test a circuit on a breadboard with a single LED and a current-limiting resistor, using pin 1 from the Raspberry Pi header, which is 3.3 volts, and pin 25, which is GND.
The LED comes on.
I’m using wires connected directly to the GPIO header pins which run to the breadboard.
Board pinout
The next issue is understanding the labels of the pins. It isn’t as simple as I would like it. First there are the board-level numbers (standard for headers?).
-
There are a total of 26 pins in two rows.
-
The inner row is odd numbers 1, 3 ,5…25
-
The outer row at the board’s edge are even numbers: 2, 4, 6…26
If you want to program to turn on pins using the basic board pin numbers, you need to specify that with the Python command:
GPIO.setmode(GPIO.BOARD)
## source: http://www.thirdeyevis.com/pi-page-2.php
import RPi.GPIO as GPIO ## import GPIO library
GPIO.setmode(GPIO.BOARD) ## Use board pin numbering
GPIO.setup(7, GPIO.OUT) ## Setup GPIO pin7 to OUT
GPIO.output(7,True) ## Turn on GPIO pin 7
Then turn off.
import RPi.GPIO as GPIO ## import GPIO library
GPIO.setmode(GPIO.BOARD) ## Use board pin numbering
GPIO.setup(7, GPIO.OUT) ## Setup GPIO pin7 to OUT
GPIO.output(7,False) ## Turn on GPIO pin 7
GPIO.cleanup()
|
Note
|
The last line in the second program deals with the error message reported to the console: "pin7-on.py:3: RuntimeWarning: This channel is already in use, continuing anyway. Use GPIO.setwarnings(False) to disable warnings." The warning is cleaned up if the GPIO.cleanup() command is used at the end of a program. BUT, the command cannot be used to end the program to turn on the LED. The cleanup command closes down the output, making the LED not stay on. I couldn’t even see that it had flashed on at all. |
GPIO pinout
The second way to number the pins is with the assignment used by the driver chip from Broadcom.
Rewriting for GPIO labels:
## source: http://www.thirdeyevis.com/pi-page-2.php
import RPi.GPIO as GPIO ## import GPIO library
GPIO.setmode(GPIO.BCM) ## Use Broadcom GPIO pin numbering
GPIO.setup(4, GPIO.OUT) ## Setup GPIO BCM pin4 to OUT
GPIO.output(4,True) ## Turn on GPIO pin4
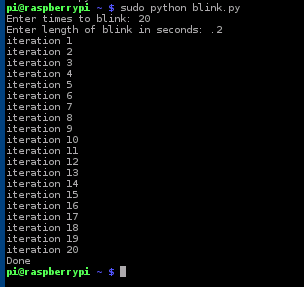
A more exciting Blink program, using Board numbers.
## www.thirdeyevis.com/pi-page-2.php

import RPi.GPIO as GPIO ## import GPIO library
import time ## time library

GPIO.setmode(GPIO.BOARD) ## board numbering
GPIO.setup(7, GPIO.OUT) ## output for board pin7
## Define function named blink()
def Blink(numTimes,speed):
    for i in range(0,numTimes): ## run loop numTimes
        print "iteration " + str(i+1) ## print current loop
        GPIO.output(7,True) ## Switch  GPIO pin7 on
        time.sleep(speed) ## wait
        GPIO.output(7,False) ## Pin7 off
        time.sleep(speed) ## wait
    print "Done" ## print after loop finishes
    GPIO.cleanup()

## Ask for number of blinks and length of blink
iterations = raw_input("Enter times to blink: ")
speed = raw_input("Enter length of blink in seconds: ")

## Start Blink() function. Convert from string to float values
Blink(int(iterations),float(speed))
My board is a revision 2.0 which I can identify using the console command cat /proc/cpuinfo.
pi@raspberrypi ~ $ cat /proc/cpuinfo
processor       : 0
model name      : ARMv6-compatible processor rev 7 (v6l)
BogoMIPS        : 2.00
Features        : swp half thumb fastmult vfp edsp java tls
CPU implementer : 0x41
CPU architecture: 7
CPU variant     : 0x0
CPU part        : 0xb76
CPU revision    : 7

Hardware        : BCM2708
Revision        : 0002  *<-- This is the board revision number*
Serial          : 00000000c7ba715e
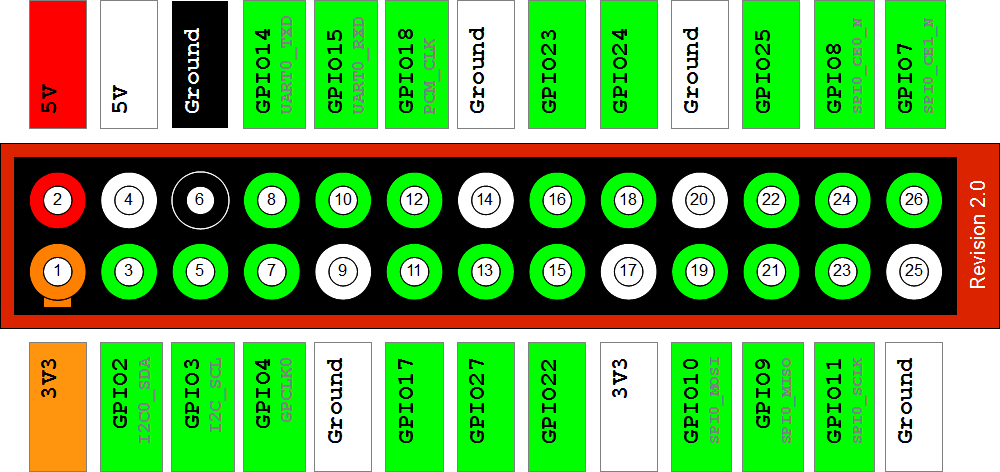
Image source: http://www.raspberrypi-spy.co.uk/2012/06/simple-guide-to-the-rpi-gpio-header-and-pins/
All of the above has been explored using ssh to connect to the Pi.
Tightvncserver has been set up on it (run manually) to let me log in remotely with a GUI. "blueberr" is the password because only 8 chars are allowed for a vnc password.
vncpasswd is the command to type to enter the password if I need to change it (I did!) There is no need to remember the old one.
I can run the LCterminal
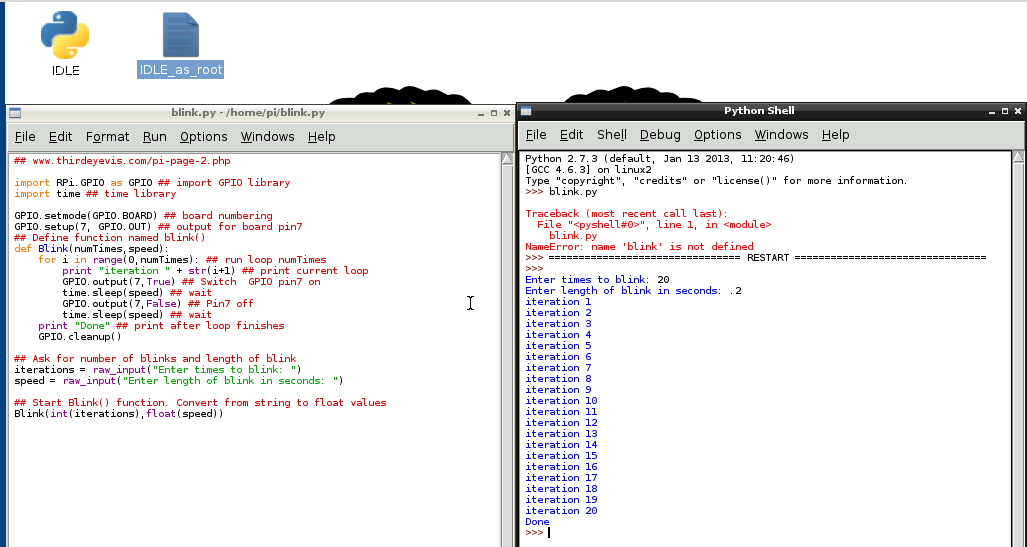
Created a Desktop file to launch IDLE run as root. source: http://www.raspberrypi.org/phpBB3/viewtopic.php?&t=16881
(I used vi(m) to do the file.)
You can create a very simple bash script to do this:

    1. Open a terminal
    2. type cd ~/Desktop
    3. type touch IDLE_as_root
    4. type nano IDLE_as_root
    5. type in /usr/bin/gksu -u root idle
    6. exit nano
    7. type in sudo chmod +x IDLE_as_root
    8. Close terminal
    9. Double click on the IDLE_as_root program on your desktop
Running as a "normal" program
Typically, I need to type sudo python progname.py to get a program to execute.
However, I can add a first line: #!/usr/bin/python to the program and then make the program executable with chmod +x progname.py
Then I can execute from the command line with: sudo ./progname.py
It isn’t that much easier, I know.