Digital Portraits
A Lesson Plan from the Massachusetts Council for the Social Studies
Using an appropriate software tool, create a digital portrait of some figure from history.
This lesson plan is a modern version of an activity I did myself in late elementary school, in grade 7 or 8, part of what is middle school these days. There isn't any reason it needs to be limited to those grade levels. Combining history and art has no age limits. Of course, you'll need to judge where it is best suited to your curriculum.
When I was the student, the assignment involved pencil and paper. The project could still be done that way, but the result isn't quite so fitting for a digital project. By being digital, the project results can be shared for reuse. That's a key element of this lesson plan. The portrait which a learner makes can be used by others, inserting the graphic into a word processing report, for example. Each person completing the project is creating an Open Educational Resource. As a classroom teacher, you may use the expanding portrait gallery as a larger resource for your school or for the district. If you choose, the portraits can even be made available for everyone by publishing to the Internet
At any level of sharing, you have an authentic audience for your students. You could even promote the project as a way for high school students to create resources for middle or elementary school classes. You might see it as an interdisciplinary project.
The recommended tool is Inkscape. Inkscape has several things going for it.
- Cross-platform - works on Windows, Macintosh and Linux computers
- Open Source - can be installed at school AND at home for students to use, no restrictions
- No license cost - won't have an impact on the budget
You may also do this same activity with other software. Any vector graphic tool is fine. LibreOffice has a Draw component that will work, and LibreOffice is also open source. Adobe Illustrator will work, but it is both very expensive and has a restrictive installation license, one purchased license you may install on one computer.
When you consider that the idea behind this project is to encourage open sharing of the results, it makes sense to choose an open tool. It is up to you and your students, of course.
The goal of the plan is to let each learner create resources for use by their peers, for other classes or even for their teachers. Publishing these resources can be done in several ways. A teacher can compile the results into a classroom blog. The district might provide teachers with individual Web sites. You could publish them on a photo sharing site like Flickr ( Students could even do this on their own. Give them Internet safety guidance if that is the chosen route. )
The Plan Details
Choose a person from history. Presidents, generals, heros ( local or national ), suffragettes, union leaders, civil rights activists, inventors, scientists, all make good choices. The focus might depend on the class curriculum. The lesson is shared from a social studies group, but could be used within any subject.
Find some examples to show off the kind of result you are looking for. See if you can show some that are "professional" and some that are less so. Maybe do one or more of your own. Try this lesson out with other staff members as a proof of concept and show your students how you are a learner, too. By doing the lesson, you will also find out how long to plan for the project. Base the project length, in part, on how easy it is for each learner to get access to a computer with the installed software. Two or three class periods in a computer lab might be enough.


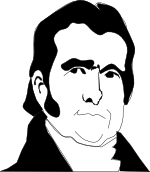
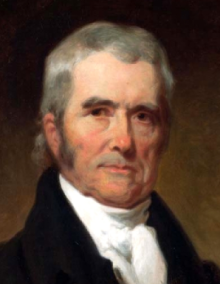
This set of directions uses John Marshall as the historical figure. He was Chief Justice of the US Supreme Court, serving from 1801-1835.
Sample image sources:
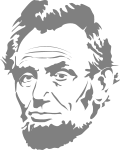
Abe Lincoln - openclipart.org - user: twoton
Abe Lincoln caricature - openclipart.org - user: Last Dino
Fidel Castro - openclipart.org - user: worker
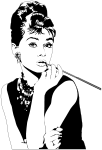
Audrey Hepburn - openclipart.org - user: pesasa
John Marshall - openclipart.org - user: algotruneman
Have each learner search on line to find a photograph or portrait of the subject. The idea here is to convert a picture into the monochrome image using mainly the Inkscape bezier tool to outline shapes of the original portrait. Determining the elements to outline as black shapes is the skill being developed. This plan does not call for freehand drawing skills.

Image source: Wikipedia
Verify that the image is NOT subject to copyright. There is an illustrative copyright case from the 2008 campaign of Barak Obama. An artist and marketer, Shepard Fairey, created a poster for the campaign. He worked from a copyright encumbered photograph taken by an Associated Press photographer ( © All rights reserved ) for which he had not obtained permission to create a derivative work.
This lesson plan asks each learner to make a derivative work. There is a section in the current copyright law that allows for "fair use", and educational use is generally considered fair use. This is a teachable moment, though, and can be used as part of the ongoing discussion of plagiarism that needs to happen in learning settings.
The design of Shepard Fairey's poster is similar to the concept of this plan, but adds color shading to the portrait. You can decide if that is a suitable extra component of the project in your case. Maybe offer such shading techniques as a challenge to the more artistic of your group.
Wikipedia may be a good on line source for a suitable portrait. Wikipedia is focused on making the content of its articles open in just the way this project needs. The images in Wikipedia articles are typically drawn from the work collected at Wikimedia Commons, a compilation of media ( over 16 million media files ) suitable for sharing. Using the search tool at Wikimedia Commons, enter the category of historical figure. Entering "US Presidents" revealed a screen full of Presidential portraits that might work well for this project.
Download the image to the local computer hard drive. My source was from Wikipedia. Ask each student to record the link to the original portrait so they can cite it at the end of their project.
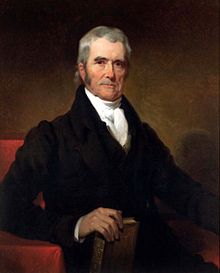
I cropped the image to make my overlay portrait less complex, but you can choose whether or not to do that step.
Cropping can be done in many different ways, but the easiest is in the basic image viewing program on your computer. Ask around about what that program is on your computer. On my version of Linux, the image viewer is called "Gwenview."
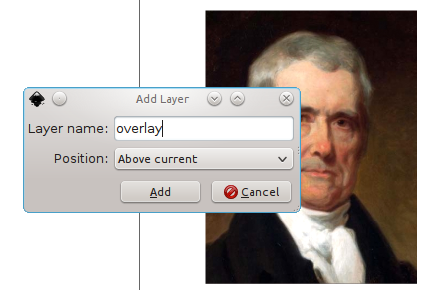
Start Inkscape. Using the File menu, import the downloaded ( cropped? ) image.
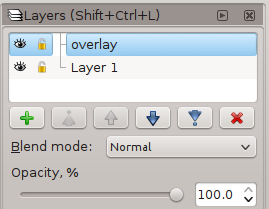
The image is imported to the base layer. It is easier to add your overlay in a second layer. Using the Layer menu, add a layer on top of the default layer. With the Layer menu, bring up the layer toolbox. You should see two layers in the toolbox/dialog. Name the top layer "overlay" if you want your example to look like mine.
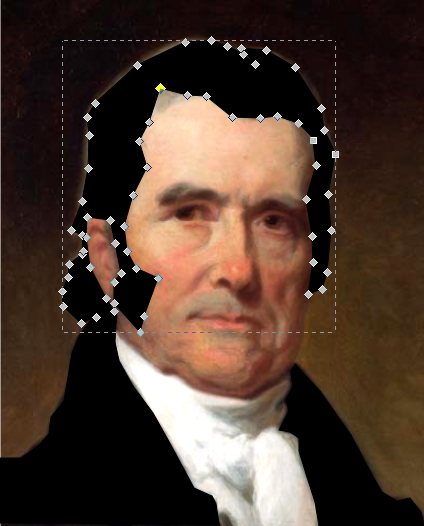
Use the Bezier tool to click points along the outline of each major element of the portrait. I began by doing the outline of the left part of Marshall's coat. Stay close to the outline of the shape and wind up back at the starting point. The number of clicks to make new outline nodes will be greater when you are working around a curve.

You can zoom in using the View menu ( or by tapping the key with the + symbol on it ). The photo will look pixellated, but you are not worried about that. Zoom out with the minus key later.
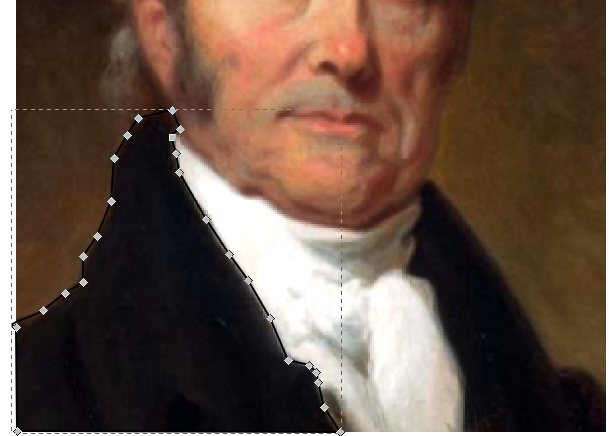
While using the bezier tool, you will only see a line tracing your progress. After you finish an outline, you can choose the path node tool to reveal the nodes you made. If a node is badly out of place, this tool will also let you click and drag individual nodes to improve the outline.
 Path node tool
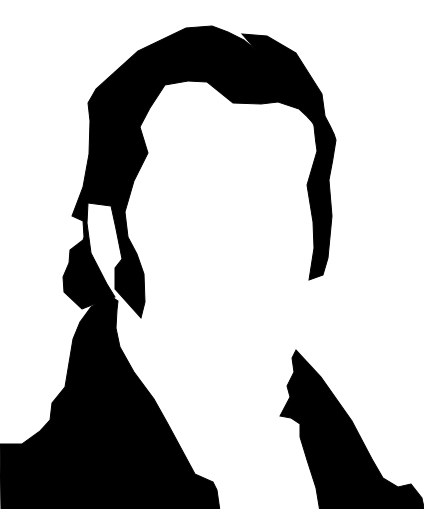
Using the color selector blocks at the bottom of the program window, choose the fill for the shape. I used black only. I was working to create a high contrast portrait in my derivative work.

Continue around the portrait. Enclose more sections. I did most of Marshall's hair as a single shape. You can always select a shape you've made and delete it so you can start again. You will notice that the shapes are made of straight line segments. You may want to change some points from being angular to smooth, but I recommend getting the basic element outlines done before you start refining.
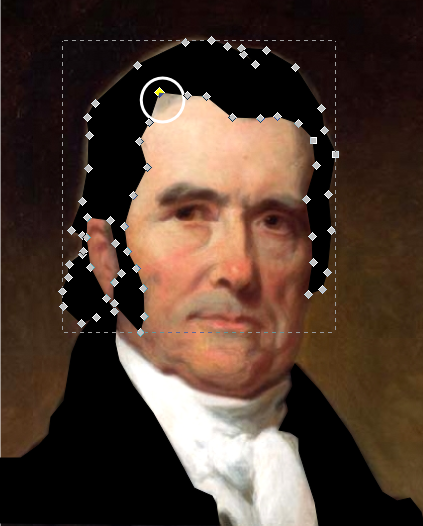
At around this point in the process, begin making the bottom layer invisible by clicking the eye symbol in the layers control dialog. Click the eye of "Layer 1" to hide the original portrait so you can see just the overlay pieces.
When the finished shape is "almost" right, you may decide to adjust positions of individual nodes of a shape instead of starting over from scratch on it. This is one of the most wonderful features of the vector graphics format used by Inkscsape. In the next two illustrations, you can see I've moved a single point so the shape of Marshall's hair looks better.

 - Basic Select tool to choose and manipulate whole shapes
- The Path Node tool: move individual nodes along shape border
 - Make a node smooth ( rounded ) instead of angular
If your shape has too many nodes, you can try the "Simplify" ( Ctrl + L ) option in the Path menu. Also, remember "Undo" ( Ctrl + Z ) in the Edit menu to back up a step if a change didn't go the way you planned.
If you want a curved effect at any point of the shape, use the smooth node button while the path node tool is active ( the selected node changes to a darker color ). The node control buttons are only available with an active Path Node tool.
Once you have the major shapes done in black-filled blocks, begin adding features that will define the face. I did the eyebrows together in one shape, letting the connecting lines between the brows serve as the crease at the top of Marshall's nose. Each eye was separate, for example.
You can create lines like the mouth and cheek elements without a closed fill shape if you end the line by double clicking at the last node of the line.
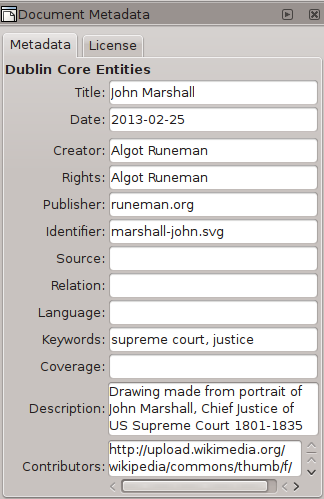
The eventual end step is to save and publish the work ( you can save and continue in the midst, of course ). Inkscape normally saves in a format known as Scalable Vector Graphic with a file extension of .svg. Inkscape can also export a Portable Network Graphic ( .png ) which is what you might use for a sharing/distribution file. Export with the base layer hidden and export only after saving in the native SVG format. You could share both the easy-to-use PNG and the SVG file, of course.
One especially nice feature of the SVG format is internal file documentation. Enter author, date, etc. in the File menu "Document Metadata" dialog. Hover over each blank to learn the kind of data to enter along with the expected format. Here's the filled dialog for my version.
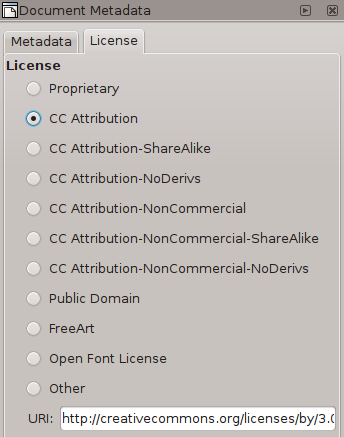
The second tab of the Metadata dialog allows you to set the license for the work. If you intend to make the student work suitable for open educational resource, please choose the least restrictive license you can. Creative Commons Attribution is the most common license used because it expects a user to give credit to the creator, but if you choose public domain designation, that's the least restrictive, no extra steps involved, no permission to seek and no attribution expected.
A creative work is automatically covered by copyright at the moment of creation. There is no requirement to register for copyright. You own all the rights to your creation. The license you choose is important, though. The "assumed" level of control is All rights reserved which is called "Proprietary" here. If you leave the default Proprietary license, the laws of the United States and most countries worldwide, say that every person who wishes to use your work must contact you in writing for EACH use of the image. The image is a whole work, and, as such, cannot be used legally without permission. Licensing is the method we are using to give others permission, ahead of time, to use the portrait. Licensing with a liberal-use license eliminates the need for each user to seek permission. That's good all around. The creator gets credit and develops a reputation. The end user gets to easily use the work. Such sharing is in the best spirit of education.
When you choose from among the Creative Commons licenses, you have several possible ways to ease or limit sharing. Maybe part of this lesson in your setting will include an exploration of the licensing options. OER benefits are greatest with a public domain declaration, but Attribution ( CC-BY ) is the most common. The Attribution license allows students to learn that it is proper to say from where and from whom a portrait came. Each shared portrait a person creates begins to build a portfolio of work for the creator. Sharing the work is the next step, an attribution license is simply asking each person who uses the work to give credit to its creator. Students see why they have been asked to cite their sources for any other part of a report done in school. This time, they are the author being cited.
Recommended Reading:
Bezier Path Tool Guide
Line Art Flat Graphics
Inkscape Basic Tutorial
Creative Commons Web site
Open Educational Resources
MCSS Web site
Projects like this one develop over time and get feedback from those who try to implement the plan. Thanks to those who have contributed to the plan's current state.
- Máirín Duffy - my Inkscape inspiration, as always