
This section of the guide is going to give you some practice with the Toolbar buttons. You will be editing with LibreOffice to practice the buttons, but realize that some of the things you learn will apply in other programs, too. Editing is making changes to your work.
We'll focus on the toolbar first. It has the buttons. It is just below the row of words (Menus).
The simplest editing involves moving the cursor thoughtfully through your writing and backspacing to remove words and inserting new words by typing at the cursor position. You should practice editing that way until you think you are really good at it. Doing things the basic way is always going to be an important skill. Add new text, move through it, change things, erase things, add new things. You cannot do anything wrong. The computer won't yell at you. Get lots of practice with the basic editing skills. Create new documents. Don't worry. If you don't want them later, we can trash them.

The backspace key is usually pretty easy to understand. You use it quite a bit right after you make a spelling typo. It begins to become natural to tap the backspace key a few times and then type the correction.
Get used to that key and how to use it.
Pause for practice...Hum...Whistle, etc.
"But, wait!" Someone in the back is shouting. "What about the delete key?
You guys up in the back are fantastic. You ask all the right questions at the perfect time.

The delete key is similar to the backspace (discounting the shape difference). Delete erases from the cursor, but forward instead of backward.
Now, resume practicing. Try both keys. Some people seem to prefer one over the other. It is a personal style thing, I guess.
What? Done already? Next, let's examine some more productive editing methods.
Instead of erasing a paragraph or a sentence one letter at a time, you can select blocks of text to delete or modify them.
Practice: Please open a document you can modify. To go along with this guide, there is a file called DocumentPractice.ott which is set up to be used with some guided exercises in this guide.
If it is available (from the Website), open the DocumentPractice.ott file. (Note: the DocumentPractice.ott file is a “template” so when you try to save it, you will need to give it a new name. That means several people can start with the same file and not accidentally overwrite it. Templates are very useful. The DocumentPractice.ott was distributed with this guide. It should be in the Documents folder on the Ubuntu computer in the Natick Senior Center computer lab. Ask how you can take a copy of it home to practice there.
You are going to learn about highlighting or selecting in this exercise. Selecting text allows you to prepare the words for some sort of change. Maybe you will want certain words to be italic or bold. It is generally best to make these formatting changes after you have typed and edited your basic text. You can do them as you go along during the typing of the original, too, of course.
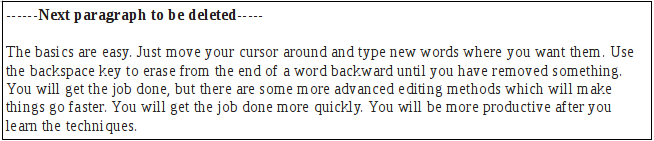
You should still see all of the text highlighted like the next illustration.
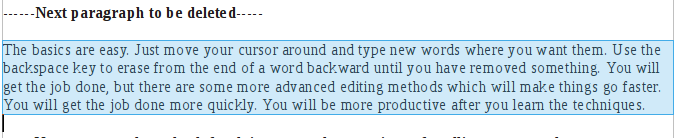
Great. Right? The duplicate paragraph is gone.
Hold on! What if you just deleted the most beautifully written text of all time? Is it really GONE? Nope. The text is not “gone”.

Undo means to do just what it says: You can undo or take back the last thing you did. Try doing that with your own examples, of course. Delete a word manually. Then tap the undo button. Type in a new word and then tap the undo button. Select single words. Delete. Undo. Try it all sorts of ways. Explore. Experiment. This guide isn't going to take you through all the practice you need. To get enough practice, always go beyond the steps listed here.
The keyboard fans among you should be asking: "Is there a way to do 'undo' without using the mouse?"
Of course there is. You know I love those keyboard shortcuts.
Hold down the Control (Ctrl) key and tap the letter "Z". That's usually written Ctrl+Z.
That gives you the same power to undo the last thing you tried, no matter whether you were adding or taking away something.
The more ways you practice the same techniques, the more natural they will become. This undo example is just one of the techniques you should practice until it becomes a habit.
NO MEMORIZATION, just repeated practice until something is part of your routine.

Be careful to use text modification properly.
Italics is used for things like book titles. Underlining used to be used for book titles, but that was a convention necessary for typewriters which could not do italics. Article titles should be put in quotation marks. Bold adds emphasis for purposes like attracting attention to special terms. Bold is not intended to make titles, headings or subheads. We'll cover headings, subheadings and document styles in another section of this guide.
Be conservative. Limit font changes. USE NO MORE THAN TWO FONTS in a document.
Font practice:
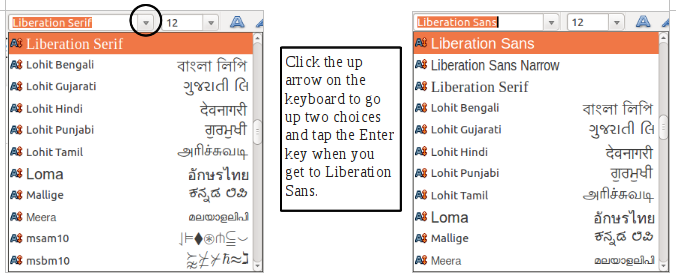
Choosing a font is a personal thing, but the LibreOffice designers made a few default choices that are worth sticking with until you have a reason to change. Basic text in paragraphs is easiest to read if it has “Serif” characters. A serif is the little drawn-out corner at the top and bottom edges of letters. Serifs help a person's eyes track along the lines of text making paragraphs easier to read. Serif text is the most common found in books printed on paper and serif fonts help when reading paragraphs which run across the width of "letter" paper for which printers in the US are designed.
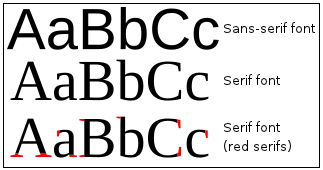
Image Credit: Wikipedia
When a font does not have those serif extensions it seems to stand up straighter and catch the attention. That makes sans-serif text good for headings, for example. Many people also feel that Web pages are easier to read if the font is sans-serif.
Main font rule: Stick with a family of fonts in one document and try to do even better by using only the serif and sans-serif of the same font family. In our example, Liberation Serif is the choice for paragraph text or "body text", as it is sometimes called. Liberation Sans is good for the short text in section headings and main title text.
Be very careful to avoid mixing fonts of the same general sort. It can be very disconcerting. If part of your document is Liberation Serif, don't mix in words that are "Times New Roman", the common serif font of Windows computers, or any other serif font for that matter. The subtle differences will bother people.

As you can see with the three lines above, while similar, these font variations easily catch ones eye.
Hey! Did you actually try doing your own example of mixing fonts to see for yourself?
Good for you! You are exploring, testing, experimenting. You are practicing.
While Microsoft Office and its word processor called MS-Word are not available for GNU/Linux, the fonts that are defaults for MS-Office are available for GNU/Linux. If you are going to work with a group of other users who mainly have Microsoft Office, check out how to find and install the MS-Office fonts on your computer. That way, you can exchange work you get from them and make changes that fit right back into Microsoft Office when you pass the document back. LibreOffice can easily open and save in the standard kind of file for Windows. Windows word processing files have a file type of .doc with those three letters added as the extension for the file name instead of the LibreOffice .odt file extension.
Adding fonts to your system is not generally something to try as a beginner. Ask for help from a more advanced user. They may have their own source for directions, but this Ubuntu Fonts Web page is a good place to start.
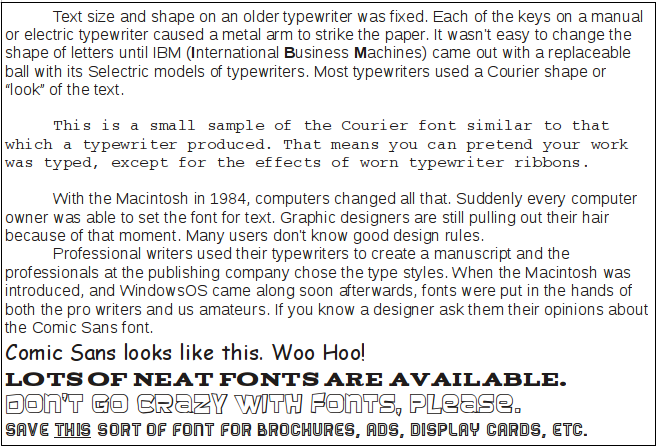
OK. I know you are dying to play with fonts. Now is the time to open a new LibreOffice Writer word processing document and test the fonts installed on your system, at least SOME of them.

Sneaky use of a fancy font can work.
 Caution:
It is very important to understand that this section in the document has shown fonts which are not on a computer by default with an Ubuntu install. If you open the ODF version of this document without also having the display fonts which the guide has used, they will not show properly. That's another big reason to stick with standard fonts in your own work. If a person uses Liberation Serif and shares a document where the default font is Times New Roman, the document will not look too terribly different. If you share a file with odd or unusual fonts, the default font will make the document look very different on a co-worker's system.
LibreOffice gives you a partial solution. If you simply want to pass a completed document to others so they can use it the way it is, even with fancy fonts you only have on your system, you can choose to Export as PDF.
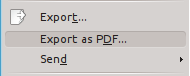
The export incorporates all the fonts, as they are used by you, into a "portable document format" (PDF) which is a kind of document that all popular systems can display and print. Other users see just what you designed. PDF viewers are available for GNU/Linux, Macintosh and Windows. The original fonts and layout do not depend on the fonts installed on the computer of the person to whom you have given the file. PDF files are a great way to deliver fancy documents to others. Take a PDF file to a printer or the local copy center. They can print it.
Do not expect a printer to make last minute changes to the PDF file, though. For that, they would need access to all the fonts you used. You should also not expect a professional printer to approve of your design. Don't pretend to know better than a design professional. By creating your own design, you get what you create.
If you keep at it, though, you can become a creative amateur. Stick with it.
Formatting of words and phrases is not all there is, but we'll break here...to keep each section under control for the Web. We'll continue in the next section to cover paragraph level formatting.
© 2013 Algot Runeman - Shared using the Creative Commons Attribution license.
Source to cite: - filedate: