Mission Inedible
In the spirit of the TV and movie series, "Mission Impossible", should you choose to accept it, CLMOOCer, here is the
Pull out the crafty acrylic paint set and decorate a keychain fob in your choice of bright colors. Do the lettering only, or add supporting pigment to the background surface, too.
Mission Statement in PDF format for easy printing. It will NOT self-destruct after 2 minutes.
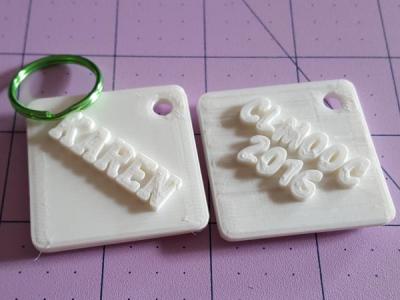
During the 2016 CLMOOC cycle, I enjoyed interactions with many wonderful people across the US and around the globe. Some of those wonderful people have a 3D printed plastic rectangle in transit via the US Postal Service. The addresses were taken from the postcard project list.
Background
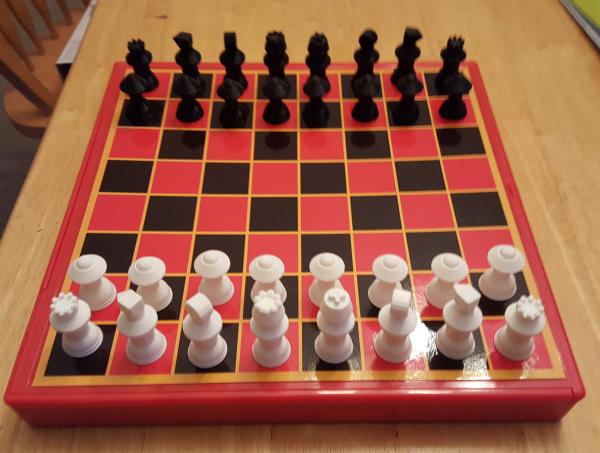
In December, I won a Lulzbot Mini 3D printer in a contest run by opensource.com. I've been having lots of fun learning to design in 3D. My biggest project, so far, has been a chess set.
But in the back of my mind, I've been trying to figure out a way to be creative with the CLMOOC postcard project. I'm not so physically crafty as I once might have been. My shaky hands prevent me from even attempting a handmade postcard with paints or other mixed media. But the arrival of the printer and the recent arrival of "the idea" mean that I can offer a physical "craft" to my fellow moocers.
I'd like to think that these fobs might be a nice "badge" to mark participation in the 2016 round of CLMOOC. Badges of a digital sort have become popular with some educators.
I hope the "mission" will suit you.
Codicil
Printing a keychain fob is pretty quick, about 20 minutes for both the front and the back. I can even take a bit longer and print a batch of four fobs at one time which just fit on the printer. The fobs only require the basic, beginner settings of the printer. Slipping the fob into an envelope is no issue, but the USPS charges more to deliver them than the cost of the plastic, the printed pages inside and the envelope combined. I have had interactions with many, but not all of the moocers on the postcard project list. After spending $80 to send off 18 fobs, I've paused.
There are many more names on the postcard project list, but I'm on hold. Going forward, I'm sending a fob on request. Connect with me by email with your mailing address if you want a fob made and sent to you.
But wait...there's more
There is also another path to getting your very own keychain fob "badge".
It takes me only a few computer keystrokes to generate the files for a 3D printer. I will be happy to send you an email with the files you need to print the fob on your own, one with your name in the code. Just ask. Then you can go to the nearest 3D printer and ask to print the front and back pieces of the fob. A few drops of Super Glue will get them to stick together. Many libraries are adding a Makerspace into their plans. My local library has a 3D printer. Some towns have dedicated makerspaces, too, where 3D printing is going on among many other exciting activities. There are also commercial services which will print 3D objects for you, though that might cost more than such a trinket is worth to you.
Deep Background
Here's the code for a keychain fob for the program OpenSCAD, an open source program (free of cost and free of proprietary restrictions) which I am using to explore 3D design. Take the next steps on your own. Read up on 3D fused filament fabrication and design your own keychain fob or any other cool thing. Join makers everywhere in this neat prototyping process. (To use the code, you will also need to download and install openSCAD. There is a version for Mac and PC as well as Linux which I use. You will also need to download and install the font "Blowhole BB" from Nate Piekos which can be used for non-profit/personal projects like this.) Other fonts already on your system may work fine, too.
// CLMOOC Key Fob for CLMOOC 2016
// Algot Runeman
// code released to the public domain - no restrictions
// version03 - 2017-01-31 - rotate to be square, fitting more fobs on the printer platform
// version02 - 2017-01-30 -  Text now done in OpenSCAD instead of Inkscape
// and reduced from 35mm to 25mm  base
// version01 - 2017-01-27 - was larger and used Inkscape for lettering
//

fudge = 0.1; // insures full removal of the hole in the corner

rotate([0,0,45]){
// key fob base
thick=2;
difference(){
hull(){
{ translate([25,0,0])
    cylinder(thick,3,3);
    translate([0,25,0])
    cylinder(thick,3,3);
    translate([0,-25,0])
    cylinder(thick,3,3);
    translate([-25,0,0])
    cylinder(thick,3,3);
}}
translate([0,20,0])
cylinder(3,3,3);
}

// Placing the text
linear_extrude(height=thick+2){
text("CLMOOC", size=10,font="Blowhole BB", halign="center", valign="baseline");
// second line below the first
    translate([0,-10,0])
    text("2016", size=10, font="Blowhole BB", halign="center");
}}
The name side is very similar, but uses a different font, AcademicM54, though any bold font will probably work well enough. I would avoid trying thin typestyles or very small sized ones unless you get further along and work with the 3D printer's more advanced speed and layer thickness settings.
// CLMOOC 2016 Key Fob - Name side
// Algot Runeman
// code released to the public domain - no restrictions to use
// version02 2017-01-31 - rotate 45 degrees to fit more on printing surface
//     may need to change font size to deal with name length
// version01 - 2017-01-27 - proof of concept

fudge = 0.1;
rotate([0,0,45]){
// key fob base
thick=1;
difference(){
hull(){
{ translate([25,0,0])
    cylinder(thick,3,3);
    translate([0,25,0])
    cylinder(thick,3,3);
    translate([0,-25,0])
    cylinder(thick,3,3);
    translate([-25,0,0])
    cylinder(thick,3,3);
}}
translate([0,20,0])
cylinder(3,3,3);
}

linear_extrude(height=thick+2){
text("KEVIN", size=9,font="AcademicM54", halign="center", valign="center");
}}
You can download a zipped file of the design and printing files, though they are only for those who want to modify the code. The name side is currently set to "ALGOT".
Final Note: The actual printer files are not these design files. Rather, they are code for the printer's "slicer" program in .stl format. If I send you files by request, you will get the OpenSCAD files above and the .stl files for the front clmooc side and for the side with your own name.
There you have it. If you have questions, speak right up. Use email, if appropriate, Otherwise, tweet, discuss on Google+ or maybe shout really loud!
Enjoy!